What are some popular lens colors for sunglasses and how do they affect glare reduction and contrast enhancement?
Custom sunglasses allow individuals to personalize their eyewear to match their unique preferences and style. They offer a range of customization options, including frame style, lens color, lens material, and additional features.
Here are some key aspects to consider when looking for custom sunglasses:
Frame Style: Custom sunglasses typically offer a variety of frame styles to choose from. Options may include classic aviators, wayfarers, rectangular frames, round frames, sporty wraparound styles, and more. Select a frame shape that complements your face shape and aligns with your personal style.
Frame Material: Custom sunglasses can be made from various materials, each with its own characteristics. Common frame materials include plastic, acetate, metal (such as stainless steel or titanium), wood, and even eco-friendly materials like recycled plastics or bamboo. Consider the durability, comfort, and aesthetic appeal of different frame materials.
Lens Options: Custom sunglasses often provide a range of lens options to suit different needs. Consider factors such as lens color, lens material, and lens coatings. Lens colors can impact how effectively sunglasses reduce glare and enhance contrast. Lens materials like polycarbonate and Trivex offer impact resistance, while options like glass and high-index plastics provide optical clarity.
Lens Coatings: Additional lens coatings can enhance the performance and functionality of sunglasses. Popular coatings include polarized coatings to reduce glare, anti-reflective coatings to minimize reflections, and mirror coatings for a stylish look. These coatings can improve visual comfort, reduce eye strain, and provide better clarity in various lighting conditions.
Prescription Options: If you require prescription lenses, many custom sunglasses can accommodate your prescription. Ensure that the chosen frame style can support prescription lenses, and provide your prescription details to the eyewear provider for accurate lens customization.
Branding and Personalization: Custom sunglasses often offer options for branding or personalization. This can include engraving your name or initials on the frames, adding custom logos or designs, or choosing unique color combinations. Explore customization options that allow you to create a truly personalized and distinctive pair of sunglasses.
UV Protection: Regardless of customization options, prioritize sunglasses that provide adequate UV protection. Look for sunglasses that block 100% of UVA and UVB rays to safeguard your eyes from harmful ultraviolet radiation.
When seeking custom sunglasses, consider reputable eyewear brands or specialized eyewear retailers that offer customization services. custom sunglass manufacturers They can guide you through the available options and ensure you receive high-quality sunglasses tailored to your preferences and needs.
Popular lens colors for sunglasses include:
Gray: Gray lenses provide true color perception and are known for maintaining natural color balance. They offer good glare reduction in bright conditions without significantly altering contrast.
Brown/Amber: Brown or amber lenses enhance contrast and depth perception. They are particularly effective in partly cloudy or hazy conditions, making them popular for outdoor activities like hiking or fishing.
Green: Green lenses provide excellent contrast and color perception. They can enhance visual clarity and are suitable for a wide range of lighting conditions.
Blue/Blue-Green: Blue or blue-green lenses offer a stylish and fashionable look. They can reduce glare and provide good color perception, making them a popular choice for fashion-forward sunglasses.
Yellow/Orange: Yellow or orange lenses enhance contrast and depth perception, making them useful in low-light or overcast conditions. They can improve visibility in fog or haze but may cause color distortion.
The impact of lens colors on glare reduction and contrast enhancement can vary. Here are some general guidelines:
Glare Reduction: Lens colors like gray, brown, green, and blue are effective at reducing glare caused by bright sunlight or reflective surfaces. They help block intense light and provide comfortable vision in bright conditions.
Contrast Enhancement: Lens colors like brown, amber, green, and yellow/orange can enhance contrast by filtering out certain wavelengths of light. This can make objects and details appear more distinct, especially in variable lighting conditions.
It’s important to note that the level of glare reduction and contrast enhancement also depends on other factors, such as the lens material, coatings, and overall lens quality. Additionally, personal preferences and specific activities or environments may influence the preferred lens color. Consider trying on different lens colors in various lighting conditions to determine which one suits your needs and preferences best.

How often should routine maintenance be conducted on waterworks valves?
There is no single definitive answer, as the maintenance schedule for waterworks valve will depend on factors like the valve type, size, service environment, usage frequency, and standards set by the utility or industry. However, here are some general guidelines for routine valve maintenance:
Gate valves
Exercise (open/close) annually and inspect/lubricate any stem/gear assemblies annually to 5 years.
Butterfly valves
Exercise annually and inspect/service components every 3-5 years. More frequent lubrication may be needed if high cycle rates.
Check valves
Inspect internally every 5-10 years depending on service conditions. Flappers/seals may need replacing within this period.

Pressure-reducing valves
Inspect/rebuild as needed every 5-10 years based on performance. Diaphragms typically last 3-5 years.
Fire hydrants
Flow test and lubricate annually. Deep maintenance like painting or replacing major parts every 3-5 years.
Air/vacuum release valves
Inspect and service annually to prevent blockages. Rebuild internals as needed.
Following AWWA standards is generally recommended. Harsh operating conditions may require more frequent attention. Proper documentation of maintenance activities is also important for asset management.
How often should I change a baby’s diaper to prevent discomfort and diaper rash?
There is no set schedule for how often to change a baby’s diaper, but baby diaper brands are some general guidelines to help prevent discomfort and diaper rash:
Newborns (0-3 months):
Change every 1-2 hours when they are awake. At night, change at a minimum every 2-3 hours.
Infants (3-6 months):
Change at least every 2-3 hours when awake. During sleep stretches, change at least every 3-4 hours.
Mobile babies (6+ months):
Change when they are wet or soiled, around every 2-4 hours when awake. Overnight, every 4-6 hours.

After feeding, changes are usually necessary as milk intake causes wetness.
If the diaper feels saggy/bulging or has a strong odor, change immediately.
Pay special attention to changes in the afternoon/evening when skin sensitivity peaks.
Always change before and after naps to keep skin dry during sleep.
Frequent, timely changes are best to prevent urine and stool from sitting against the skin for too long. Redness or irritation is a sign changes may need to happen sooner. Don’t hesitate to change more often if needed for comfort.
What are some common signs of combined air release valve wear or damage that I should look for during inspections?
Here are some key things to look for when inspecting combined air release valve:
Leakage
Check for water seepage around joints, connections which could indicate seal or gasket failure.
Float/diaphragm issues
Look for sticks, cracks, waterlogging that prevent proper rise/fall motion.
Excessive corrosion
Rust or scale buildup inside valve body or on metal parts is a problem.

Missing bolts/screws
Joint fasteners should be tightly secured with no loose or missing hardware.
Damaged casing
Cracks, dents or coating breaks can compromise structural integrity.
Orifice blockage
Debris in the small air escape port prevents valves from functioning.
Worn connections
Stripped threads, degraded seals where inlet attaches to pipe needs attention.
Erratic behavior
Noise, chattering, sticking issues suggest internals may need servicing.
Old age
Valves over 10+ years in frequent use often need gasket/float replacement.
Checking for these types of defects helps proactively maintain air valves and prevents failures from disrupting flow in critical piping systems.
How do traffic engineers determine the placement of traffic lights?
Traffic engineers use a systematic approach to determine the placement of traffic lights at intersections. They consider various factors related to traffic flow, safety, pedestrian needs, and community requirements.
Here are some key considerations in the process:
Traffic Volume and Intersection Capacity: Traffic engineers analyze the volume of vehicles approaching an intersection from various directions. They consider peak hour traffic, turning movements, and overall traffic demand to determine if a traffic light is necessary. If the traffic volume exceeds the capacity of the intersection to operate efficiently, a traffic light may be warranted.
Intersection Configuration: The physical layout of the intersection plays a crucial role in determining the need for a traffic light. Factors such as the number of lanes, geometric design, sight lines, and presence of turning lanes are examined. Complex or high-traffic intersections may require traffic lights to manage conflicting movements and enhance safety.
Safety Considerations: Traffic engineers evaluate the safety record of an intersection, considering factors such as crash history, pedestrian and bicycle activity, and proximity to schools or other high-pedestrian areas. If an intersection has a high incidence of accidents or poses safety concerns, installing a traffic light can help control traffic and enhance safety.
Pedestrian and Bicycle Needs: The presence of significant pedestrian and bicycle traffic influences traffic signal placement. Engineers assess the demand for pedestrian crossings, including factors such as pedestrian volumes, proximity to schools or parks, and accessibility requirements. Traffic lights may be installed to provide safe crossing opportunities and accommodate pedestrians and cyclists.
Traffic Signal Warrants: Many jurisdictions have established traffic signal warrants or guidelines that help determine if a traffic light is justified at a particular intersection. These warrants consider factors such as traffic volume, delay, pedestrian volumes, crash history, and other specific criteria. If an intersection meets the specified criteria, it may warrant the installation of a traffic light.
Community Input and Local Regulations: Community input and feedback are valuable in the decision-making process. Traffic engineers may conduct public meetings, surveys, or consultations with local stakeholders to understand community concerns and preferences. Additionally, engineers must comply with local regulations, guidelines, and policies that govern traffic signal placement and operation.
Overall Traffic Network Considerations: Traffic engineers also evaluate the placement of traffic lights in the context of the entire traffic network. traffic light manufacturers They consider the coordination and synchronization of signals along corridors to optimize traffic flow and minimize delays. Balancing the needs of individual intersections with the efficiency of the overall network is important in determining traffic light placement.
By considering these factors and conducting thorough traffic studies and analyses, traffic engineers can make informed decisions about the placement of traffic lights. The goal is to optimize traffic operations, enhance safety, and meet the specific needs of each intersection and the surrounding community.
What are some common criteria used in traffic signal warrants?
Common criteria used in traffic signal warrants vary depending on the jurisdiction and specific guidelines in place.
However, here are some commonly considered factors that are often included in traffic signal warrants:
Minimum Vehicle Volume: A minimum threshold of vehicle volume is typically required on one or more approaches to an intersection within a specified time period. This criterion ensures that there is sufficient traffic demand to warrant the installation of a traffic signal.
Peak Hour Traffic Volume: The volume of traffic during peak hours is often considered. If the traffic volume exceeds a certain threshold during the peak period, it may indicate a need for a traffic signal to regulate traffic flow and improve intersection operations.
Intersection Delay: Intersection delay refers to the amount of time vehicles spend waiting at an intersection. If the delay experienced by vehicles exceeds a predetermined limit, it may indicate that a traffic signal is necessary to manage traffic more efficiently and reduce congestion.
Crash History: The crash history of an intersection is an important factor. If an intersection has a significant history of accidents, especially those involving serious injuries or fatalities, it may indicate a need for a traffic signal to improve safety and reduce collision risks.
Pedestrian and Bicycle Activity: The presence of high pedestrian or bicycle volumes is often considered. If an intersection is heavily used by pedestrians or cyclists, a traffic signal may be warranted to provide safe crossing opportunities and accommodate their movements.
School Zones and High-Pedestrian Areas: Proximity to schools, parks, or other areas with high pedestrian activity is taken into account. Traffic signals may be warranted in these areas to ensure the safety of pedestrians, particularly children and vulnerable road users.
Intersection Geometry and Sight Lines: The physical layout of the intersection, including the number of lanes, turning lanes, and visibility conditions, is considered. Complex intersections or those with limited sight lines may require a traffic signal to manage conflicting movements and enhance safety.
Traffic Control Alternatives: Traffic engineers may also evaluate other traffic control alternatives, such as stop signs or roundabouts, to determine if they can adequately address the traffic issues without the need for a traffic signal.
It’s important to note that these criteria are not used in isolation but are considered collectively. Traffic engineers follow established guidelines and standards specific to their jurisdiction to assess the need for traffic signals at intersections. These criteria help ensure that traffic signals are installed where they are most beneficial in terms of traffic flow, safety, and overall transportation system performance.

What are some common fire safety standards and building codes that fireproof insulation boards should meet?
Fireproof insulation boards should meet specific fire safety standards and building codes to ensure their effectiveness and compliance with regulations. The applicable standards and codes may vary depending on the country, region, and specific application.
Here are some commonly referenced fire safety standards and building codes:
National Fire Protection Association (NFPA) Standards: NFPA develops and publishes numerous standards related to fire safety. Some relevant standards include:
NFPA 101: Life Safety Code: This code provides requirements for the design, construction, operation, and maintenance of buildings to ensure life safety, including fire protection measures.
NFPA 5000: Building Construction and Safety Code: This comprehensive code covers the design and construction of buildings, including fire protection provisions.
NFPA 90A: Standard for the Installation of Air Conditioning and Ventilating Systems: This standard covers the installation of HVAC systems, including fire-resistive duct enclosures and fire dampers.
International Building Code (IBC): The IBC is a model building code widely adopted in the United States and many other countries. It includes provisions for fire safety, including requirements for fire-resistant construction materials and assemblies.
European Standards (EN): In Europe, fire safety standards for construction materials and products are established by the European Committee for Standardization (CEN). Relevant standards include:
EN 13501: Fire classification of construction products and building elements: This standard provides a classification system for the fire performance of construction products, including insulation materials.
EN 1366: Fire resistance tests for service installations: This series of standards covers fire resistance testing for various service installations, including ducts, pipes, and ventilation systems.
Underwriters Laboratories (UL) Standards: UL is a globally recognized independent safety certification organization. They provide testing and certification services for fire safety and performance of various products, including insulation materials. UL standards relevant to fire protection include:
UL 723: Standard for Test for Surface Burning Characteristics of Building Materials: This standard evaluates the surface burning characteristics of materials, fireproof insulation board including flame spread and smoke development.
UL 1709: Rapid Rise Fire Tests of Protection Materials for Structural Steel: This standard specifically addresses fire protection materials for structural steel elements.
These are just a few examples of the many fire safety standards and building codes that may apply to fireproof insulation boards. It is essential to consult the specific codes and regulations applicable in your region and consult with professionals, such as architects, engineers, or fire safety experts, to ensure compliance with the appropriate standards for your project.
What are some other fire safety standards and building codes that are commonly referenced?
Here are some other commonly referenced standards and codes related to fire safety:
International Fire Code (IFC): The IFC is a model code that provides regulations for fire prevention, fire protection systems, and life safety in new and existing buildings. It covers a wide range of fire safety aspects, including construction materials, occupancy classifications, means of egress, fire alarm systems, and fire suppression systems.
British Standards (BS): In the United Kingdom, fire safety standards are established by the British Standards Institution (BSI). Some relevant BS standards include:
BS 476: Fire tests on building materials and structures: This series of standards covers fire testing and performance requirements for building materials, including insulation materials.
BS 9999: Code of practice for fire safety in the design, management, and use of buildings: This code provides guidance on fire safety measures for building design, management, and operation.
Australian Standards (AS): Australia has a set of fire safety standards developed by Standards Australia. Some relevant AS standards include:
AS 1530: Methods for fire tests on building materials, components, and structures: This series of standards provides methods for testing the fire performance of various building materials and assemblies.
AS 4072: Components for the protection of openings in fire-resistant walls: This standard covers components used for fire-resistant wall openings, such as fire doors, fire-resistant glazing, and fire dampers.
Canadian Codes and Standards: In Canada, fire safety standards are established by various organizations, including the National Research Council (NRC) and the Canadian Standards Association (CSA). Some relevant codes and standards include:
National Building Code of Canada (NBCC): The NBCC provides requirements for the design and construction of buildings, including fire safety provisions.
CAN/ULC-S101: Standard Methods of Fire Endurance Tests of Building Construction and Materials: This standard outlines methods for fire endurance testing of building construction materials and assemblies.
These are just a few examples of additional fire safety standards and building codes that are commonly referenced in various countries and regions. It is important to consult the specific codes and regulations applicable in your area and seek guidance from local authorities, building professionals, or fire safety experts to ensure compliance with the appropriate standards for your specific project.
What should I do if the long staple cotton towels starts to lose its shape after washing?
Here are some things you can try if your long staple cotton towels start to lose their shape and fluffiness after washing:
Air dry instead of machine drying.
The tumbling motion in dryers can cause towels to bunch up out of shape over time. Lay flat to air dry.
Use less detergent.
Too much detergent left in the fibers can cause towels to feel stiff rather than fluffy. Use the minimum needed.
Try a fabric softener.
Adding a softener to the final rinse cycle will help condition the fibers to retain more plushness after washing.

Block towels back into shape while damp.
Lay flat and gently pull and smooth the fibers until they regain their rectangular form.
Replace your washing machine if old.
Older machines may be rough on towels. Look for gentle/delicate cycles.
Do a towel-refreshing wash.
Add 1/2 cup white vinegar to the rinse. Vinegar restores softness lost over time.
Only wash towels when soiled.
Don’t wash after just one use if not needed. This preserves their shape longer.
Consider rotating towels.
Swap in a freshly washed set periodically so towels aren’t used until shape is gone.
With some tweaks to washing habits and techniques, long staple cotton towels should maintain their luxurious texture and loftiness longer.
How is the severity of a leak determined after a negative pressure leak test?
A negative pressure leak test is a method used to detect leaks in a sealed system or component. The test involves creating a negative pressure inside the component or system, and then monitoring for any pressure drop over time, which would indicate the presence of a leak.
Here are the general steps involved in a negative pressure leak test:
Prepare the component or system: The component or system to be tested should be properly cleaned and sealed to prevent any leaks from external sources.
Create a negative pressure: A vacuum pump or other device is used to create a negative pressure inside the component or system. The pressure is typically measured in units such as inches of mercury (inHg) or millibars (mbar).
Monitor the pressure: The pressure inside the component or system is monitored over a period of time, typically several minutes to several hours, depending on the specific application.
Interpret the results: If the pressure remains stable over the monitoring period, it indicates that there are no leaks in the system. If the pressure drops, it indicates the presence of a leak. The location and severity of the leak can be determined by further testing or inspection.
Negative pressure leak tests are commonly used in industries such as automotive, aerospace, and industrial manufacturing, negative pressure leak test as well as in medical and laboratory settings. The test is often performed on components and systems such as fuel tanks, pipes, and HVAC systems to ensure that they are properly sealed and free of leaks.
The severity of a leak detected during a negative pressure leak test is determined by measuring the rate at which the pressure drops inside the sealed component or system being tested. The rate of pressure drop can be used to calculate the volume of air or fluid leaking from the system per unit of time.
The severity of a leak can be classified into different levels, typically based on the volume of leakage per unit of time.
The specific classification system used may vary depending on the industry and application, but some common classifications include:
Class I: Small leaks with a low volume of leakage, typically less than 1 cc/min (cubic centimeters per minute).
Class II: Moderate leaks with a moderate volume of leakage, typically between 1-10 cc/min.
Class III: Large leaks with a high volume of leakage, typically greater than 10 cc/min.
The severity of the leak can also be determined based on the specific application and the requirements for the system being tested. For example, a small leak in a fuel tank may be considered severe due to the potential safety risks, while a similar leak in a non-critical component may be considered less severe.
Once the severity of the leak is determined, appropriate actions can be taken to repair or replace the component or system to prevent further leakage and ensure safe and reliable operation.

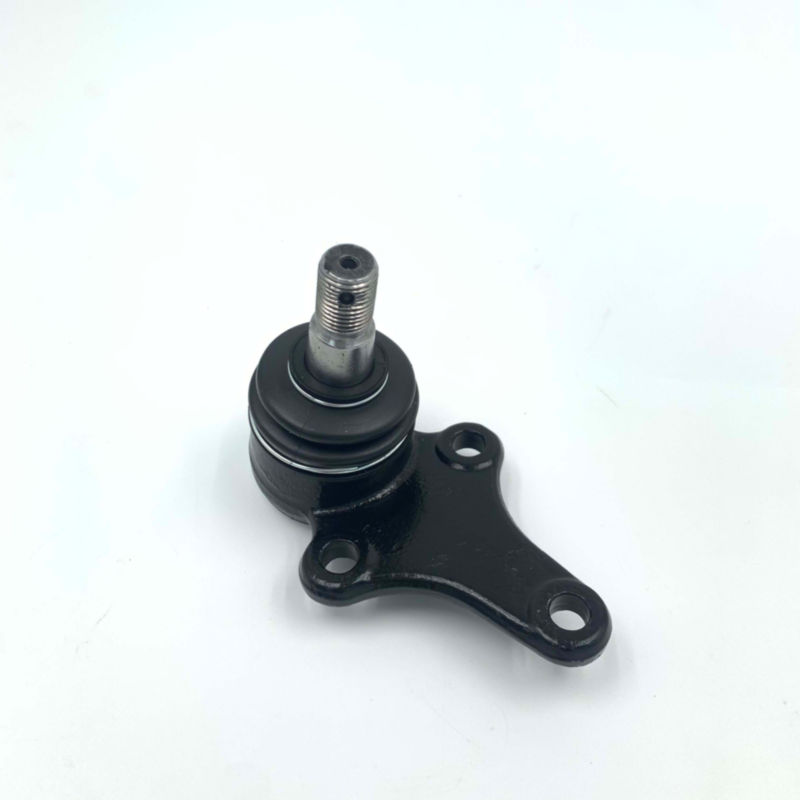
How to Replace a Ball Joint on a Toyota Hilux?
Below is a general guide to replacing a ball joint on a Toyota Hilux. Keep in mind that the specific steps may slightly vary depending on the model year and configuration of your vehicle. Always consult your vehicle’s owner’s manual or a professional mechanic for precise instructions.
Tools and Materials:
Jack and jack stands
Wheel chocks
Lug wrench
Socket wrench set
Ball joint separator or pickle fork
Ball joint press
New ball joint
Torque wrench
Grease (if applicable)
Steps:
Park the vehicle on a level surface and engage the parking brake. Place wheel chocks behind the wheels to prevent the vehicle from rolling.
Loosen the lug nuts on the wheel you are working on, but do not remove them entirely.
Jack up the vehicle and place it securely on jack stands. Remove the lug nuts and the wheel.
Remove the cotter pin and castle nut from the ball joint. hilux ball joint The cotter pin helps to secure the castle nut, which connects the ball joint to the steering knuckle.
Disconnect the ball joint from the steering knuckle using a ball joint separator or a pickle fork. Be cautious not to damage the rubber boot or other components.
Remove the ball joint from the control arm by using a ball joint press or by following the specific removal procedure for your vehicle.
Install the new ball joint onto the control arm using the ball joint press or the specific installation procedure for your vehicle. Ensure that it’s properly seated.
Reconnect the ball joint to the steering knuckle by tightening the castle nut to the manufacturer’s specified torque. Insert a new cotter pin to secure the castle nut.
Grease the new ball joint if it has a grease fitting, following the manufacturer’s recommendations.
Reinstall the wheel and tighten the lug nuts in a star pattern. Lower the vehicle off the jack stands and torque the lug nuts to the proper specification.
Perform a test drive to verify that the issue has been resolved and the vehicle is handling properly.
Keep in mind that replacing ball joints can be a challenging task, especially for those without prior experience. If you are unsure about any of the steps or lack the necessary tools, it’s best to consult a professional mechanic for assistance.
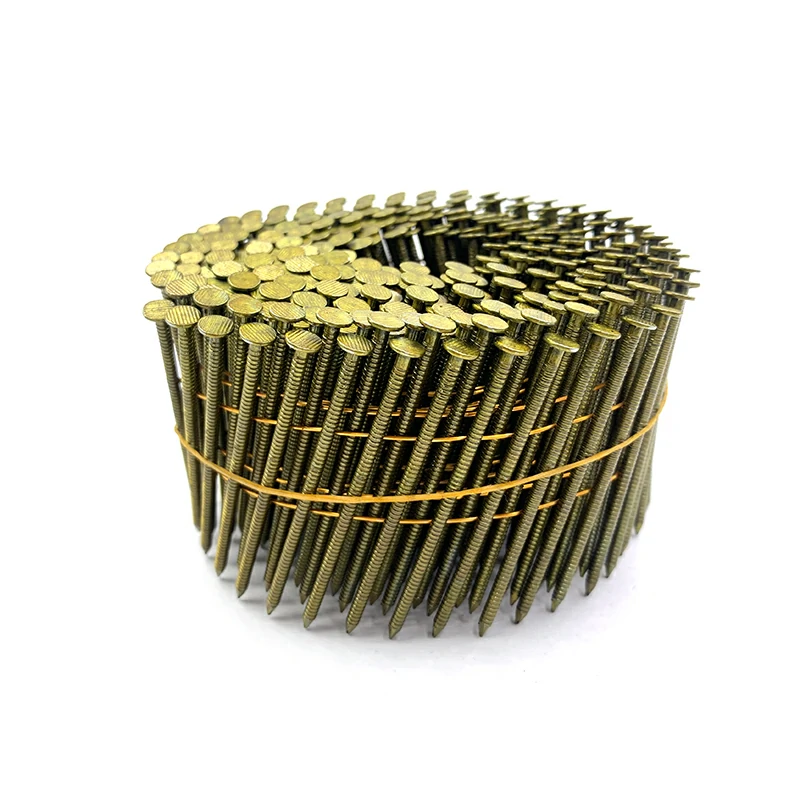
What are some factors to consider when choosing the right size of galvanized coil siding nails?
Galvanized coil siding nails are a type of nail that is used in the construction industry for attaching siding materials to a building’s exterior.
Here are some key features of galvanized coil siding nails:
Material: Galvanized coil siding nails are made from high-quality steel that is coated with zinc to provide resistance to corrosion. This makes them ideal for use in outdoor applications where exposure to the elements can cause rust and deterioration.
Size: Galvanized coil siding nails are available in a range of sizes, typically ranging from 1 1/2 inches to 2 1/2 inches in length. The size of the nail will depend on the thickness of the siding material being used.
Angle: Galvanized coil siding nails are typically designed with a 15-degree angle, which allows the nail gun to access tight spaces and corners.
Coil: Galvanized coil siding nails are collated in coils, which makes them easy to load into a nail gun. The coils typically contain 120 to 360 nails, depending on the size and manufacturer.
Application: Galvanized coil siding nails are specifically designed for use in attaching siding materials to a building’s exterior. They can be used with a variety of siding materials, including vinyl, wood, fiber cement, and metal.
Overall, galvanized coil siding nails are a durable and reliable fastening solution for attaching siding materials to a building’s exterior. Their high-quality steel construction and zinc coating provide resistance to corrosion, making them ideal for use in outdoor applications. The 15-degree angle and coil design make them easy to use with a nail gun, and they are available in a range of sizes to accommodate different siding materials.
Choosing the right size of galvanized coil siding nails is important to ensure that the nails hold the siding securely in place.
Here are some factors to consider when choosing the right size of galvanized coil siding nails:
Siding material thickness: The thickness of the siding material being used is an important factor to consider when choosing the size of the nails. Siding materials vary in thickness, with wood and vinyl typically being thinner than fiber cement and metal. The nail should be long enough to penetrate the siding material and the underlying sheathing or framing, but not so long that it penetrates too deeply and causes damage.
Nail shank diameter: The diameter of the nail shank also affects the strength of the nail. A thicker shank will provide more holding power, Galvanized Coil Siding Nails 15 Degree but may also require a larger diameter hole to be drilled in the siding material. A thinner shank may be easier to install, but may not provide enough strength to hold the siding securely.
Nail head size: The size of the nail head is important to consider when choosing the right size of galvanized coil siding nails. The head of the nail should be large enough to hold the siding material in place, but not so large that it causes damage to the siding material or detracts from the aesthetic appearance.
Building codes: Building codes may specify the minimum size and length of nails that must be used for siding installation. It is important to check local building codes before selecting the size of the nails.
Manufacturer recommendations: The manufacturer of the siding material may have recommendations for the size and type of nails to use for installation. It is important to follow these recommendations to ensure that the siding is installed correctly and meets the manufacturer’s warranty requirements.
Overall, choosing the right size of galvanized coil siding nails involves considering the thickness of the siding material, the diameter of the nail shank, the size of the nail head, building codes, and manufacturer recommendations. By taking these factors into account, you can select the right size of nail to ensure a secure and long-lasting installation of your siding.